
Usually, due to the different water needs of flowering plants, it is best to irrigate them using a drip or micro-irrigation system with individual emitters. In addition to being an efficient method of watering, the drip method will protect flowering plants by keeping their leaves and flowers dry. However, micro-irrigation is more suitable for sandy or porous soils.
There are two main types of emitters – those that actually allow water to drip or seep onto the root zone (drip irrigation), and those that direct water into the air much like a miniature sprinkler head (micro-sprinkler). Both types are usually installed into tubing using barbed ends or pushed into the ends of micro tubing. However, drip irrigation lines often come with preinstalled emitters, spaced from 12 – 36 inches along the poly tube. All emitters act as regulators to control the quantity and rate of water discharge. Although emitters available on today’s market have many common characteristics, they will differ in size and shape, as well as internal design. Output rates for emitters range from ½ to 2 gallons per hour, and those with different output rates can even be installed on a single run of tubing. This allows you to compensate for plants with diverse watering needs located in close proximity. There are also emitters available that offer flow rate options – adjustable from a steady drip to a slow stream of water.
Emitters deliver the right amount of water directly to the roots of the plants. However, it is still necessary to choose the correct emitter to fit your needs.
While emitter hoses and miniature sprinkler head systems are more suited for closely spaced plants, drip emitters are best in situations where plants are more widely spaces, or even in separate containers.
There are four main categories of emitters. Three of these – porous pipe, pre-installed emitter lines, and punch-in emitters – are types of drip irrigation. Micro-irrigation consists of microsprinkler heads that can direct water above the root system.
1. Porous Pipe
Porous pipe is often referred to as soaker hose, drip hose, and even laser tubing. They are either manufactured from very porous material or consist of hose which has been drilled with extremely small holes – both which allow water to slowly seep through. Their greatest advantage is cost, being very inexpensive. It is also extremely easy to work with. Simply wind the hose through your planting beds and hook it up to an existing water hose or outdoor faucet. The hose can be moved from place to place in a matter of minutes or buried a few inches below the surface for a more permanent installation.
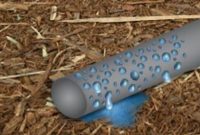
However, porous pipe is not without its disadvantages. It is not possible to regulate the water pressure within the pipe, and both high areas and locations near the end of the hose will emit less water. Also, due to its basic design, porous pipe is very susceptible to clogging. This problem can be diminished by using in areas where the mineral content of the water is low and by making use of a fine filter.
2. Pre-installed Emitter
Pre-installed emitter lines are just that – poly lines manufactured with equally spaced emitters molded into the walls of the pipe. Common sizes are ¼ and ½ inch pipes, with spacing from 12 to 36 inches apart. They are designed to deliver water at rates of ½, 1, or 2 gallons per hour, with each rate suitable for different soil types. Plan to use 2 gph emitters in sandy soils, 1gph emitters if your soil is mostly loam, and ½ gph emitters in less porous clay soils. Like the previous mentioned porous pipe, these emitter lines can be placed on the ground surface and covered with mulch – a very simple installation.

A major advantage over porous pipe is that their turbulent flow design helps keep them from clogging. This type of irrigation is often used to irrigate vegetable gardens and groundcover beds, as well as other mass plantings such as hedges. They are also efficient around trees and shrubs. A certain disadvantage for landscape irrigation is linked to the fact that the pre-installed emitters are placed at regularly spaced intervals, which doesn’t allow for placement flexibility.
3. Punch-in Emitter
Punch-in emitters allow you to place an emitter anywhere along the length of pipe by punching a hole and attaching the emitter with an inlet barb. Some emitters even have self-piercing barbs that will make their own hole. Goof plugs can be purchased to close a hole if you need to change an emitter’s location during or after installation. Punch-in emitters are available in the usual flow rates of ½, 1, and 2 gph as well as 4 gph. If you are unsure of the requirement for your type of soil, stick with 1gph emitters. An advantage of punch-in emitters is that they can be replaced with ones having a higher or lower flow rate if your system is not meeting your needs. If an area is still receiving too much water, simply remove a few emitters and plug the holes. Or add additional emitters to sections that are too dry. Punch-in emitters can also be placed in the end section of the tubing, which can be useful for container plantings.
There are three main types of punch-in emitters, allowing for a wide range of uses. Drip emitters are the most popular since they are able to deliver a slow, steady supply of water that seeps deep into the root system while keeping the surface virtually dry. Although most drip emitters are installed in tubes at ground level, some manufactures market emitters designed to be attached to stakes and held above ground. Misters are usually found in greenhouses and other high humidity applications. Other practical applications include providing a cooling mist in patio areas and watering hanging baskets since the fine mist rarely condenses on leaves. In-line drip emitters are a cross between drip emitters and a pre-installed emitter line. Like drip emitters, outlets can be placed individually anywhere along the length of the poly tube. However, they must be affixed directly to the line, and like emitter line, water is released through each outlet as it continues on through the line. In-line drip emitters are usually available in ½ or 1 gph rates only, made for ½ tubing, and are most efficient when used to water small plants in short rows.
4. Micro-Sprinkler Heads

Finally, micro-sprinkler heads, often referred to as low-volume sprayers, represent a type of irrigation system with characteristics of both drip irrigation and sprinkler head systems. Like drip irrigation systems, micro-sprinkler heads operate with low water pressure and use small diameter pipes. However, they deliver water in a fanlike spray in the same manner as traditional sprinkler heads. In the matter of water conservation, they are not as efficient as punch-in and in-line emitters, since they are prone to lose water due to evaporation, but they are more efficient than the high-pressure sprinkler heads used in standard irrigation systems. They are available in a variety of coverage radii, up to a full circle, and can even be set to spray in strips. Although they usually set on risers, these risers are non-retractable and cannot be used on lawns. Another form of micro-sprinkler heads is microbubblers, which are popular in shrub beds.
You will find drip irrigation to be a very efficient method of irrigation, with efficiency ratings up to 15% higher than a standard irrigation system. With the current push to live “green,” this might be enough to steer you toward a drip irrigation system. However, the simple design requirements, ease of installation, and small financial investment might be the final push to a drip irrigation system destination.